Re-Doing the Django Tutorial With FastAPI and React: Database & Models
Part 2: Setting up a Database and Writing the models
Welcome to part 2 of this series where we're building the Poll App from the Django Tutorial, using FastAPI and React ! In part 1, we saw how to set up a FastAPI project using Docker, and wrote our first path operation. Today in Part 2, we'll go one step further and start working with a relational database.
As usual the source for this part is available on Github
Here's what's on the menu :
- Spinning up a Postgres Database using docker-composedatabase)
- Installing our ORM of choice: SQLAlchemy
- Writing the Question and Choice model for the poll app
Note: In the original Django tutorial, this is also where django-admin is introduced. For our own admin dashboard we'll be using react-admin which will be presented in a later part of this series !
Requirements
We'll be using docker-compose to run our databse as a service. If you haven't installed it yet, the instructions are available here !
You don't have to use docker-compose to follow along though. If you prefer to set up your PostgresSQL server yourself, just skip directly to Instaling the ORM
💽 Spinning up the database
First of all, we need a database to work with. I chose docker-compose to run a Postgres image along with our app. Our API is already dockerized so this will make it easy to managage everything.
I will not dive into the specifics of docker-compose as it's beyond the scope of this article. However if you've never used it before, I encourage you to go read th documentation. It's quite extensive !
Add a docker-compose.yml at the root of you project, with the following instructions :
  version: "3.9"
  services:
    web:
      build: .
      depends_on:
        - db
      ports:
        - "80:80"
      env_file:
        - postgres.env
        - .env
      volumes:
        - ./app:/app
    db:
      image: postgres
      restart: always
      volumes:
        - data-volume:/var/lib/postgresql/data
      env_file:
        - postgres.env
    pg_admin:
      image: dpage/pgadmin4
      environment:
        - PGADMIN_DEFAULT_EMAIL=user@domain.com
        - PGADMIN_DEFAULT_PASSWORD=password
      ports:
        - "81:80"
  volumes:
    data-volume:
This configuration will launch the following:
The web service
This is our api running on the port 80. We mount the /app folder containg the app code into the container so we don't have to rebuild it everytime we make a change.
We also include two environment files:
- postgres.env: This will hold the database credentials
.env: For environments variables specific to the web servcie
The
dbserviceThis service runs a postgres image using the same
postgres.envthan the API to configure the database. That way we can keep our environment variables DRY. It also uses thedata-volumedeclared at the end of the file to persist the data.The
pg_adminservice
This runs a pgAdmin admin image. pgAdmin is an adminisitration tool for PostgreSQL database. Declaring it as a service will make configuring the server connection eaiser as we'll benefit from docker-compose custom network. We expose it on port 81 to avoid conflicting with the API running on the port 80.
To configure the postgres image, create the postgres.env file at the root of the project, with the following variables :
 #postgres.env

  POSTGRES_PASSWORD=password
  POSTGRES_USER=poll
  POSTGRES_DATABASE=poll
  POSTGRES_HOST=db
We'ready to launch everything! Just run docker-compose up and you should see the output for each service. Now you can access pgAdmin at localhost:81. To connect to the postgres database, simply add a new server and enter information from postgres.env like so :

That's it !
Now that our environment is up and running in let's dive in !

⚙️ Configuring our ORM: SQLAlchemy and Alembic
Contrary to Django, FastAPI doesn't ship with a built-in ORM solution like django-orm. FastAPI focuses on enabling you to build perfomant and robust APIs super efficiently, and let you make your own choices for everything else. You could avoid relational databases altogether and use MongoDB for instance. This lets you build an architecture tailored to your needs.
It does mean that we have to configure our ORM ourserlves though. For this tutorial we'll use SQLAlchemy, a reliable solution under active developement.
First let's install a few dependencies. From you app folder run poetry add sqlalchemy psycopg2-binary alembic pydantic.
Besides SQLAlchemy this will install the followingd packages:
- psycopg2: A python adaptater for PostgresSQL. Required by
SQLAlchemy(And also by Django when working with Postgres) - alembic: This will be our migrations management tools
- pydantic: Data validation and settings management using python type annotations. If you've worked with DRF before, you can think of pydantic models as the equivalent of serializers.
Using environment variables :
We will need to access the environement variables in order to set up the connection with the database. We'll use a special pydantic class called BaseSettings. Add a config.py file to app/app with the following code :
#app/app/config.py

from pydantic import BaseSettings


class Settings(BaseSettings):
    POSTGRES_USER: str
    POSTGRES_PASSWORD: str
    POSTGRES_DATABASE: str
    POSTGRES_HOST: str
When instantiating the class with settings = Settings(), pydantic will read the variables from the environment and validate them against the types we defined, raising an error if anything is missing. This class is actually a great selling point of pydantic, offering tons of other functionalities like automatic parsing of list and dict type. More information is available here.
SQLAlchemy
Let's configure SQLAlchemy to connect to our Database. Create app/app/database.py and put the following code in it :
# app/app/database.py

from sqlalchemy import create_engine
from sqlalchemy.ext.declarative import declarative_base
from sqlalchemy.orm import sessionmaker

from . import config


# The declarative base we'll use to create our model
Base = declarative_base()
For now all we're concerned with is writing the models, so we only need to configure the declarative base from which they will inherit. In part 3 we'll come back to this file to create a session maker to use in our path operations.
Alembic ⚗️
Last bit of configuration before writing the models: Alembic. This is SQLAlchemy own migration manager. It will allows us to do the same thing than django's makemigrations and migate commands, but we need to initialize it first !
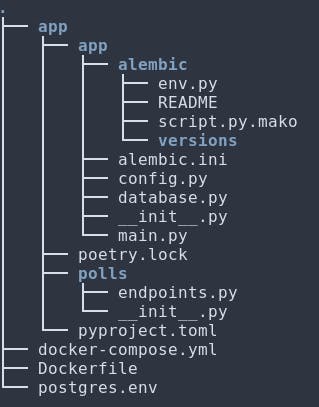
Let's first generate the configuration files for alembic. From the root of the project cd into the app directory and run alembic init. This will create the configuration scripts for alembic. Your project strucutre should now look like this :

We also need to let Alembic know where to find this scripts, so we can run the commands from the root of the project. We can do so by setting the ALEMBIC_CONFIG environment variable :
//.env

ALEMBIC_CONFIG=/app/app/alembic.ini
Now let's edit the env.py file to configure the connection to the database. If you open this file, you'll see that it's mostly composed of two functions, corresponding to the two available modes of alembic:
run_migrations_online: Configure the online mode. This is the one that we will be using.run_migrations_offline: Configure the offline mode. This mode allows the user to generate SQL instructions instead of running the migrations directly against the database
In both case, we need to edit the way the connection URL is set up. Instead of reading it from alembic.ini we'll use the Setting class we created earlier to generate it from our environement variables. Like so :
  from app.config import Settings

  settings = Settings()

  ...

  def run_migrations_offline():

    ...

    url = f"postgresql://{settings.POSTGRES_USER}:{settings.POSTGRES_PASSWORD}@{settings.POSTGRES_HOST}/{settings.POSTGRES_DATABASE}"

    context.configure(
        url=url,
        target_metadata=target_metadata,
        literal_binds=True,
        dialect_opts={"paramstyle": "named"},
        compare_server_default=True,
    )

  ...

  def run_migrations_online():

    ...

    url = f"postgresql://{settings.POSTGRES_USER}:{settings.POSTGRES_PASSWORD}@{settings.POSTGRES_HOST}/{settings.POSTGRES_DATABASE}"
    connectable = engine_from_config(
        {"sqlalchemy.url": url},
        prefix="sqlalchemy.",
        poolclass=pool.NullPool,
    )
To try it out, drop into the web container, and run alembic revision -m "test revision". This will create an empty revision in the file alembic/version folder :
"""test revision


Revision ID: 2af1b91bea53
Revises: 27259876f63d
Create Date: 2021-11-12 18:21:26.442182

"""
from alembic import op
import sqlalchemy as sa


# revision identifiers, used by Alembic.
revision = '2af1b91bea53'
down_revision = '27259876f63d'
branch_labels = None
depends_on = None


def upgrade():
    pass


def downgrade():
    pass
If the file is generated wihtout errors, then Alembic is correctly configured ! You can delete this revision safely, we'll generate a new one from the models in a moment.
Now we're finally ready to write our models and generate the associated migrations !
📝 Writing the models
We'll need two model for our Poll app :
- A
Questionmodel : This will hold the question text - A
Choicemodel: A possible answer for a question.
There is a one-to-many relation between a Question and a Choice
To create them, add a models.py file to the poll folder, with the following code in it :
#/app/polls/models.py

from datetime import datetime

from sqlalchemy import Column
from sqlalchemy import DateTime
from sqlalchemy import ForeignKey
from sqlalchemy import Integer
from sqlalchemy import String
from sqlalchemy.orm import relationship

from app.database import Base


class Question(Base):
    __tablename__ = "poll_question"

    id = Column(Integer, index=True, primary_key=True)
    question_text = Column(String(200), nullable=False)
    pub_date = Column(DateTime, nullable=False, default=datetime.utcnow)

    choices = relationship("Choice", backref="question")


class Choice(Base):
    __tablename__ = "poll_choice"

    id = Column(Integer, index=True, primary_key=True)
    choice_text = Column(String(200), nullable=False)
    votes = Column(Integer, default=0, nullable=False)
    question_id = Column(Integer, ForeignKey("poll_question.id"))
If you're coming from Django, it's important to note a few key differences with django-orm:
- You have to set the tablename yourself with the
__tablename__class attribute. Here I followed the Django convention<app_name>_<model_name>but you're free to do as you please ! - We also need to designate a column to serve as the primary key.
- The column are nullable by default, we have to explicetly set
nullable=False - Relationships need to be explicitely declared with the relationship functions. This enables ORM features like loading a question's choices using
question.choices
As you can see, SQLAlechmy is a bit more "low level" than Django-ORM which means it needs more configuration. However, it also means that you have a more fine-grained control over its behavior, and as we'll see later in this tutorial it makes querying more explicit!
Now that our models are declared let's see how we can automatically generate the corresponding migrations with Alembic.
 the great migration
To automatically generate our migrations, we need to let Alembic know about our models. To do that, we'll simply import them into our env.py file. This is a bit like registering a new app into a django app settings.py.
We also need to import Base, as it is our declartive base that contains all the information for building the tables corresponding to our model. Each time a class inherits from Base, it adds its own instructions to Base.metadata. These instructions are passed to Alembic through the target_metadata variable, so we need to assign it to Base.metadata.
#app/app/alembic/env.py

# We import the models and our declartive base
import polls.models
from app.database import Base

...

# Find this line near the top of the file
# And replace None with Base.metadata
target_metadata = Base.metadata
All done ! Run alembic version --autogenerate -m "create question and choice models" to automatically creathe the migration file.
It should generate the following instructions :
"""create_question_and_choice

Revision ID: 27259876f63d
Revises:
Create Date: 2021-11-11 10:52:50.386678

"""
from alembic import op
import sqlalchemy as sa


# revision identifiers, used by Alembic.
revision = '27259876f63d'
down_revision = None
branch_labels = None
depends_on = None


def upgrade():
    # ### commands auto generated by Alembic - please adjust! ###
    op.create_table('poll_question',
    sa.Column('id', sa.Integer(), nullable=False),
    sa.Column('question_text', sa.String(length=200), nullable=False),
    sa.Column('pub_date', sa.DateTime(), nullable=False),
    sa.PrimaryKeyConstraint('id')
    )
    op.create_index(op.f('ix_poll_question_id'), 'poll_question', ['id'], unique=False)
    op.create_table('poll_choice',
    sa.Column('id', sa.Integer(), nullable=False),
    sa.Column('choice_text', sa.String(length=200), nullable=False),
    sa.Column('votes', sa.Integer(), nullable=False),
    sa.Column('question_id', sa.Integer(), nullable=True),
    sa.ForeignKeyConstraint(['question_id'], ['poll_question.id'], ),
    sa.PrimaryKeyConstraint('id')
    )
    op.create_index(op.f('ix_poll_choice_id'), 'poll_choice', ['id'], unique=False)
    # ### end Alembic commands ###


def downgrade():
    # ### commands auto generated by Alembic - please adjust! ###
    op.drop_index(op.f('ix_poll_choice_id'), table_name='poll_choice')
    op.drop_table('poll_choice')
    op.drop_index(op.f('ix_poll_question_id'), table_name='poll_question')
    op.drop_table('poll_question')
    # ### end Alembic commands ###
Always check the migrations generated by Alembic to verify that everything is correct. You can find more information about what alembic can auto-generate here
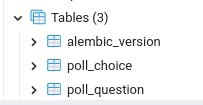
Everything checks out, now run alembic upgrade head to apply the migration, then head over to pgAdmin, and you should see the new tables !

Congrats ! You're models are ready !
Conclusion
Thats all for today, hope you enjoyed it! Now that we've set up our relational database, in part 3 we'll see how to communicate with in it our path operations using SQLAlchemy session.
In the meantime you reach out to me on Twitter. Questions and feedback are most welcomed !

