Building an acquisition Funnel in React with Xstate - Part 1

Search for a command to run...
I don't know about you, but each time I await something in Python, I get a tiny itch in the back of my brain. Not because I don’t know what it does or how to use it, that part’s fine. I write my async defs, slap some await in there, and it just works...
A few days ago, I stumbled upon a thread talking about the trade-offs of squash-merging a PR VS creating a merge commit. One of the topics of discussion was whether or not reverting merge commits was possible. Here’s the thread in question: https://...

Introduction Authentication is something most web applications need, and that can be difficult to get right. Recently I had to implement it for a React app I was developing, and wanted to list the options available to me. So I did a bit of research ...

Note: This is part 4 of a multi-part tutorial on FastApi and React. If you want to start from the beginning (which I recommend!😉) here's part 1! Welcome to part 4 of this tutorial! Today we'll see how to connect a React app to our awesome FastAPI ba...

Forms are often tricky to get right with React. While there are great libraries like formik or React Final Form to do the heavy lefting for us, handling file upload still isn't always straightforward. In today's episode of React Tips & Tricks, we'll...

Building (and maintaining) an acquisition funnel is something that most development teams will be asked to do at some point. This is no small task as this funnel will often be the main entry point to the company products or services. This means that such a funnel needs to be completely reliable to avoid losing customers to bugs, and fully flexible to allow the marketing team to optimize the conversion rate.
In this two-part article we'll see how to accomplish that easily by using a strong programming pattern: a Finite State Machine. We'll be using React and Xstate for the implementation, but the principles can be applied to any stack really.
Today in part 1, we'll see how to implement the state machine that powers the funnel, and building the actual steps and handling user data will be covered in part 2.
You can find the code in this repository. I encourage you to clone the project and play with it !
As always when it comes to programming, the best way to learn something is to get our hands dirty.
Let's say we work for a team building company, and the marketing team wants us to build an acquisition funnel that allows our customers to choose an activity and register a bunch of people.
They need us to implement the following funnel :
In part 1 we'll try to implement the different steps of the tunnel without actually submitting anything. We'll see how we handle that in part 2 :D
Note: Although I recommend reading it, this section isn't strictly necessary to be able to implement our solution. So if you'd like to jump into the action skip to the Implementation
Before we get down to it, I'd like to justify our modeling choice: the finite state machine. I'll go into more detail in a separate article, but for now let's just get a quick overview of this pattern.
Let's take a shortcut and quote the Wikipedia article :
A finite-state machine (FSM) or finite-state automaton (FSA, plural: automata), finite automaton, or simply a state machine, is a mathematical model of computation. It is an abstract machine that can be in exactly one of a finite number of states at any given time.The FSM can change from one state to another in response to some inputs; the change from one state to another is called a transition.
Basically it is a robust, readable and deterministic way of modeling process. For example here how we coud model a traffic light using a State machine:
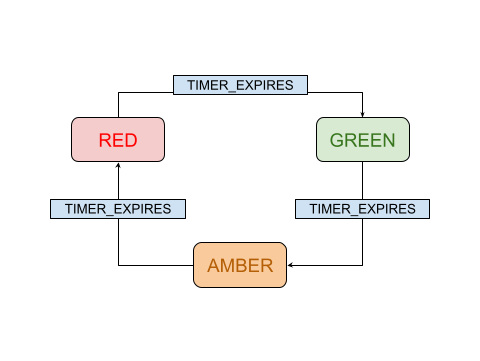
Easy !
The important bit in the definition above is that the machine is guaranteed to be in only one state at a time. This guarantee is a tremendous step forward in solving our use case.
It's also really easy to apply this model to a funnel, by simply mapping each step to a state, because it does exactly what we want: Displaying a single step at any given time.
Furthermore, the state of our funnel will be decided by the sequence of events triggered by the users, and will be fully deterministic.
This means that if we draw the correct state diagram, and feed it to a component able to execute a state machine, we can be certain that the funnel will behave as we want it to.
There are two different types of finite state machine :
You choose the type to use depending on your use case. A Mealy machine allows to reduce the number of state for the same number of different outputs, while a Moore machine is often more straight forward and easy to read.
Apart from the finite states machine there are other kinds of machine :
For now, as our only concern is the sequence of steps of the funnel, a Moore Machine will suffice !
Going back to our requirements, modeling our acquisition funnel is now completely straightforward :
This player is generated using the xstate vizualizer from the machine implementation found in this article
Now that we're confident in the reliability of our model, let's implement it!
yarn create react-app --template typescriptyarn add xstatemkdir src/acquisition-funnelLet's start by translating our state chart into code. Funny thing though: The diagram above was actually generated from the code by the xstate vizualizer. Automatic documentation ! Yay !
First let's create src/acquisition-funnel/types.ts where we'll the events types :
# types.ts
export const SELECT_ACTIVITY = "SELECT_ACTIVITY";
export const SUBMIT_ATTENDEE = "SUBMIT_ATTENDEE";
export const ADD_ATTENDEE = "ADD_ATTENDEE";
export const ADD_INFO = "ADD_INFO";
export const SUBMIT_ADDITIONNAL_INFORMATION = "SUBMIT_ADDITIONNAL_INFORMATION";
It is always a good idea to store constants into variable.
Now let's get to the machine itself. Create a file called state-machine.ts in src/acquisition-funnel, and add the code below to it.
# state-machine.ts

import { Machine } from "xstate";
import {
  SELECT_ACTIVITY,
  SUBMIT_ATTENDEE,
  ADD_ATTENDEE,
  ADD_INFO,
  SUBMIT_ADDITIONNAL_INFORMATION,
} from "./types";

export const stateMachine = Machine({
  id: "funnel-state-machine",
  initial: "activity",
  states: {
    activity: {
      on: {
        [SELECT_ACTIVITY]: "register_attendee",
      },
    },
    register_attendee: {
      on: {
        [ADD_ATTENDEE]: "register_attendee",
        [ADD_INFO]: "additional_information",
        [SUBMIT_ATTENDEE]: "payment",
      },
    },
    additional_information: {
      on: {
        [SUBMIT_ADDITIONNAL_INFORMATION]: "payment",
      },
    },
    payment: {
      type: "final",
    },
  },
});

export default stateMachine;
As you can see each state of our diagram is listed, and the available transition for each state are described by the on attribute.
FunnelProviderNow that our state machine is ready, we need to design a component that handles rendering the step components associated with each state. In order to do that we'll use the Compound component pattern.
The FunnelProvider will hold the current state in a context, making it available to the children State components.
Each state component will only render if if the current state match, getting the rendering and the state machine in sync !
First add a file called FunnelProvider.ts to src/acquisition-funnel, and add the following code to it :
import React, { useContext } from "react";
import { StateMachine, State } from "xstate";
import { useMachine } from "@xstate/react";

// We use a generic type to be able to handle
// any shape of context with type checking
interface FunnelProviderProps<TContext> {
  stateMachine: StateMachine<TContext, any, any>;
  children: React.ReactNode;
}

interface FunnelContextValue {
  currentState: State<any>;
  send: (state: string) => void;
}

const FunnelContext = React.createContext({} as FunnelContextValue);

function FunnelProvider<TContext>({
  stateMachine,
  children,
}: FunnelProviderProps<TContext>): React.ReactElement {
  const [current, send] = useMachine(stateMachine);
  return (
    <FunnelContext.Provider value={{ currentState: current, send }}>
      {children}
    </FunnelContext.Provider>
  );
}

// This is a common patter to avoid import
// the constext in every consumer
export const useFunnel = () => useContext(FunnelContext);

export default FunnelProvider;
Then create a StateRenderer.tsx file in src/acquisition-funnel and add the following code to id :
import React from "react";
import { useFunnel } from "./FunnelProvider";

interface StateProps {
  state: string;
  children: (send: any) => React.ReactNode;
}

const StateRenderer: React.FunctionComponent<StateProps> = ({
  state,
  children,
}) => {
  const { currentState, send } = useFunnel();

  return currentState.matches(state) ? (
    <div>{children(send)}</div>
  ) : (
    <div></div>
  );
};

export default StateRenderer;
Here we use the Render props pattern to allow passing the send property to the the compontent render into State. We'll se why it's useful in the next step
Now that we've got our state-machine and our compound component FunnelProvider and StateRenderer, all that's left to do is choosing what to render.
Add the following code to App.tsx :
# App.tsx

import React from "react";
import FunnelProvider from "./acquisition-funnel/FunnelProvider";
import StateRenderer from "./acquisition-funnel/StateRenderer";
import RegistrationStep from "./acquisition-funnel/RegistrationStep";
import { stateMachine } from "./acquisition-funnel/state-machine";
import {
  SELECT_ACTIVITY,
  SUBMIT_ATTENDEE,
  ADD_ATTENDEE,
  ADD_INFO,
  SUBMIT_ADDITIONNAL_INFORMATION,
} from "./acquisition-funnel/types";
import "./App.css";

function App() {
  return (
    <div className="App">
      <FunnelProvider stateMachine={stateMachine}>
        <StateRenderer state="activity">
          {(send) => {
            return (
              <div>
                <h2>Activity Step</h2>
                <button onClick={() => send(SELECT_ACTIVITY)}>next</button>
              </div>
            );
          }}
        </StateRenderer>
        <StateRenderer state="register_attendee">
          {(send) => (
            <RegistrationStep
              add_participant={() => send(ADD_ATTENDEE)}
              additional_information={() => send(ADD_INFO)}
              proceed_to_payment={() => send(SUBMIT_ATTENDEE)}
            />
          )}
        </StateRenderer>
        <StateRenderer state="additional_information">
          {(send) => {
            return (
              <div>
                <h2>Additional information</h2>
                <button onClick={() => send(SUBMIT_ADDITIONNAL_INFORMATION)}>
                  next
                </button>
              </div>
            );
          }}
        </StateRenderer>
        <StateRenderer state="payment">
          {() => {
            return <h2>payment</h2>;
          }}
        </StateRenderer>
      </FunnelProvider>
    </div>
  );
}

export default App;
Thanks to all the work we've done this step is really easy: We simply use the StateRenderer inside our provider to render the active step. The StateRenderer passes the necessary callbacks to move into the funnel using our render prop.
The Registration Step is a tad more complex because I wanted us to be able to see the loop in the registration step. That's why it's defined in its own component :
import React, { useState } from "react";

interface RegistrationProps {
  add_participant: () => void;
  additional_information: () => void;
  proceed_to_payment: () => void;
}
const RegistrationStep: React.FunctionComponent<RegistrationProps> = ({
  add_participant,
  additional_information,
  proceed_to_payment,
}) => {
  const [counter, setCounter] = useState(1);

  return (
    <div>
      <h2>Register participant number {counter}</h2>
      <button
        onClick={() => {
          setCounter((counter) => counter + 1);
          add_participant();
        }}
      >
        Continue registering
      </button>
      <button onClick={additional_information}>
        Add additional information
      </button>
      <button onClick={proceed_to_payment}>Proceed to Payment</button>
    </div>
  );
};

export default RegistrationStep;
We simply increment a counter each time we call add_participant
And we're done ! The funnel we've built is completely deterministic and meets the requirements. If we need to change the flow, all we have to do is update state-machine.tx. Isn't that great ?

That's it for today ! Hope you enjoyed part 1, we've accomplished a lot already ! Of course we can't really submit anything yet, head over to part 2 to discover how we handle that !